Bench Degree·ELECTROMAGNETISMchapter
Chapter 1: The Magnet, the Tube, and the LED
Before any definitions, before any equations, you are going to make electricity with your hand. Everything else in this book explains what happened.
Go and get four things. A cardboard tube from a roll of paper towels. A spool of thin insulated copper wire, the kind sold as magnet wire or transformer wire. One LED, any colour. One neodymium magnet small enough to fall freely down the tube, roughly 10 mm (0.4 in) across.
Total cost, if you own none of it, is about fifteen dollars. Total time is ten minutes.
Wind the wire around the middle of the tube. Not neatly. Just keep going in the same direction, turn after turn, until you have a band of wire about 25 mm (1 in) wide and several hundred turns deep. Leave 150 mm (6 in) of wire loose at each end. Scrape the enamel off the last 10 mm (0.4 in) of both ends with sandpaper or a knife, because that enamel is an insulator and the whole point is to make contact. Twist one bare end to each leg of the LED.
That is the entire apparatus. Nothing is plugged in. There is no battery. There is no power supply in the room.
Now hold the tube upright and drop the magnet down through it.
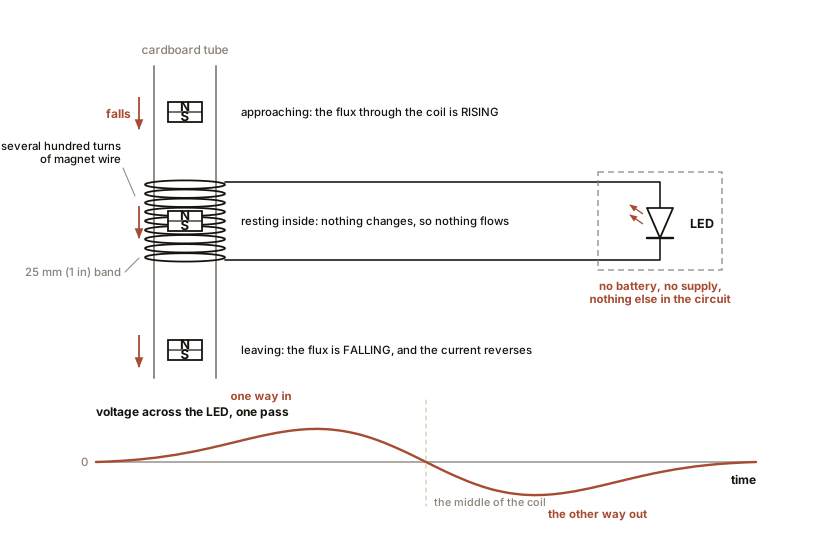
The LED flickers. Once, briefly, as the magnet passes the coil.
Do it again. It flickers again, in the same place, every time.
Now put a piece of tape over the bottom of the tube so the magnet cannot fall out, drop the magnet in, tape the top, and shake the tube back and forth in your hand at about the speed you would shake a cocktail.
The LED lights up and stays lit.
You are generating electricity. It is happening between your fingers, from a magnet and some wire, with nothing else involved at all. Shake harder and it gets brighter. Stop shaking and it goes dark instantly. Let the magnet sit still in the middle of the coil, resting directly against the wire, and nothing happens at all.
ON THE BENCH: The coil, the magnet, and the LED
Parts: cardboard tube; 30 m (100 ft) of 28 to 30 AWG enamelled magnet wire; one LED; one neodymium disc magnet about 10 mm x 5 mm (0.4 in x 0.2 in); sandpaper; tape. Everything else: every part this book asks for is listed once, at the back, in Appendix A: The Bench. Nothing is specified by brand, so it can be ordered from anyone. You do not need any of it yet. Cost: about $15 if you own nothing. Time: 10 minutes. Hazards: none worth the word. Neodymium magnets are brittle and will chip if you let two snap together, and they should be kept away from pacemakers and credit cards. What you should see: a single flicker as the magnet falls past the coil. A steady glow while the magnet is shaken. Complete darkness while the magnet sits still inside the coil. If nothing happens: you almost certainly did not remove enough enamel. Scrape both ends again until you see bare copper. Second most likely cause is too few turns; add more. An LED conducts in only one direction, so a very slow single pass may light it on the way in and not on the way out.
Section 1: What Just Happened, In One Sentence
Here is the sentence, and it is the whole book.
A magnet moving near a wire pushes electricity through that wire.
Not a magnet near a wire. A magnet moving near a wire. That distinction is the reason the LED goes dark when the magnet sits still, and it is the reason you had to shake the tube rather than simply hold it. It is also, as it happens, the reason the electrical grid outside your window is built the way it is, the reason the motor in your refrigerator turns, and the reason a radio works.
Hold on to how little you had to know to see that. You did not need to know what electricity is. You did not need to know what a magnetic field is. You did not need an equation. The effect does not care whether you understand it.
The rest of this chapter builds the vocabulary to say what you already watched. Then the rest of the book takes that one sentence and follows it out, in order, until it has produced the twentieth century.
Section 2: What Electricity Actually Is
Everything around you is made of atoms, and atoms have electrons on the outside. In a metal, some of those electrons are held so loosely that they wander freely between atoms, drifting about like people in a crowded room with no particular destination.
That is a wire, sitting on the table doing nothing. Trillions of electrons, wandering aimlessly.
Current is what you have when those electrons stop wandering aimlessly and start moving in the same general direction. That is all. Current is not a substance that gets injected into a wire. The electrons were already there. Current is the electrons already present, marching instead of milling.
Current is measured in amperes, usually shortened to amps. One amp is a very large number of electrons per second, about 6.24 x 10^18 of them, and you will never need that number again. What matters is the comparison: an LED runs on about 0.02 amps, a phone charger delivers 1 or 2 amps, a household circuit is protected at 15 or 20 amps, and the starter motor in a car briefly draws 200 amps or more.
Voltage is the push. Electrons do not march on their own. Something has to shove them, and voltage is the measure of how hard the shove is. It is measured in volts. A single AA battery pushes with 1.5 volts. A household outlet in North America pushes with 120 volts, and in most of Europe with 230 volts. The transmission line on the tall steel towers outside town pushes with 345,000 volts.
Resistance is how hard the wire fights back. Electrons moving through a metal collide with atoms constantly, and every collision costs energy, which comes out as heat. Resistance is measured in ohms. A short piece of copper has a resistance so low it is difficult to measure. The heating element in a toaster has a resistance of a few tens of ohms, which is exactly why it glows.
IN PLAIN ENGLISH: Voltage is the push. Current is the flow. Resistance is the friction. Give a wire more push and more electrons flow. Give it more friction and fewer flow.
The water analogy, and where it stops working
Almost everyone learns this with water, and the analogy is genuinely good, so here it is.
Picture a pipe with water in it. Voltage is the water pressure. Current is the flow rate, the litres or gallons per minute actually moving past a point. Resistance is the narrowness of the pipe. Raise the pressure and more water flows. Narrow the pipe and less water flows.
That will carry you a long way. It correctly predicts that a thin wire heats up more than a thick one, that a longer wire delivers less, and that a bigger push moves more current.
Here is where it breaks, and you should know now rather than be surprised later. In a water pipe, the water is the thing being delivered. Turn on a tap and the water leaves. In a wire, the electrons are not delivered anywhere. They are already in the wire, they stay in the wire, and they move astonishingly slowly, on the order of a fraction of a millimetre per second in a typical household circuit. What travels quickly is not the electrons but the push, which propagates down the wire at close to the speed of light.
The usual image is a bicycle chain. Push the pedal and the far end of the chain moves immediately, even though no individual link travelled from your foot to the wheel. What moved fast was the influence, not the material. Electricity works like the chain, not like the water.
Keep the water analogy. Just remember it is a loan, not a possession, and we will hand it back in Chapter 4.
Section 3: Ohm’s Law, and Why You Only Need One Equation Today
Voltage, current and resistance are locked to one another by the simplest useful relationship in all of engineering. Georg Ohm published it in 1827.
V = I x RVoltage equals current multiplied by resistance. Rearranged,
I = V / R, which is the form you will use most: the
current that flows is the push divided by the friction.
Try it. Take a 12 volt car battery and a resistance of 6 ohms.
I = V / R = 12 / 6 = 2 ampsHalve the resistance to 3 ohms and the current doubles to 4 amps. Double the resistance to 12 ohms and the current halves to 1 amp. That is the entire content of the law, and it holds for essentially every conductor you will meet in this book.
SLOW DOWN. Check Your Understanding: A household outlet supplies 120 volts. You plug in a device whose resistance is 60 ohms. How much current flows? Work it out before reading on.
I = V / R = 120 / 60 = 2 amps. If you got 2 amps, keep going. If you got 7,200 you multiplied instead of dividing, which is the single commonest slip with this equation, and it is worth catching now rather than in Chapter 3.
Section 4: Power, Which Is the Thing You Actually Buy
Voltage on its own does nothing. Current on its own does nothing. What lights a room, turns a motor and heats a kettle is the two of them together, and that product has a name.
P = V x IPower, measured in watts, is voltage multiplied by current. A 120 volt circuit carrying 0.5 amps delivers 60 watts. The same 60 watts can be delivered by 12 volts at 5 amps, or by 240 volts at 0.25 amps. Power is what matters; the split between push and flow is a design decision.
This matters more than it looks, and it is worth planting the seed now. The utility company does not sell you volts and it does not sell you amps. It sells you watts, over time. A kilowatt-hour, the unit on your bill, is a thousand watts sustained for one hour.
Real figures for scale, in both common systems:
| Thing | Power |
|---|---|
| The LED you just lit | about 0.05 W |
| Phone charger | 5 to 20 W |
| Refrigerator, while running | 100 to 200 W |
| Microwave oven | 1,000 to 1,200 W (1.0 to 1.2 kW) |
| Electric kettle | 1,500 W (1.5 kW) |
| Central air conditioner | 3,000 to 5,000 W (3 to 5 kW) |
| Small commercial rooftop unit | 20,000 W (20 kW) |
Because power is voltage times current, there are two ways to deliver a given amount of it: high voltage with low current, or low voltage with high current. Those two options are not equivalent, and the difference between them decided the shape of the electrical grid, ended one of the great commercial fights of the nineteenth century, and made one man rich and another bitter. That is Chapter 3. For now, notice only that the choice exists.
Section 5: A Magnetic Field Is Something You Have Already Felt
Take two magnets and push them together the wrong way round. They resist. Turn one over and they leap together hard enough to sting.
Whatever is doing that is happening in the space between them, where there is nothing at all. That nothing-at-all with a property in it is called a field, and it is a genuinely strange idea that took physics two centuries to become comfortable with. A magnetic field is a condition of the space around a magnet such that another magnet placed there feels a force.
You cannot see it. You can map it, and you should, because the shape turns out to matter enormously.
ON THE BENCH: Mapping a field
Parts: a bar magnet; a sheet of paper; iron filings, or steel wool cut up fine with scissors, or the iron powder shaken out of a bag of iron-fortified breakfast cereal. Cost: under $5. Time: 5 minutes. Hazards: iron filings in the eye. Do not blow on them. Keep them off anything with a hard drive in it. Method: lay the paper over the magnet and sprinkle filings on top, tapping gently. What you should see: the filings arrange themselves into curved lines running from one end of the magnet to the other, dense and tightly packed near the ends and spreading out in wide arcs between. Nobody arranged them. Each filing turned to lie along the field where it happened to land. Then: slide a second magnet in beside the first, both facing the same way, and watch the pattern rearrange. This is what an electric motor’s designer spends their career doing.
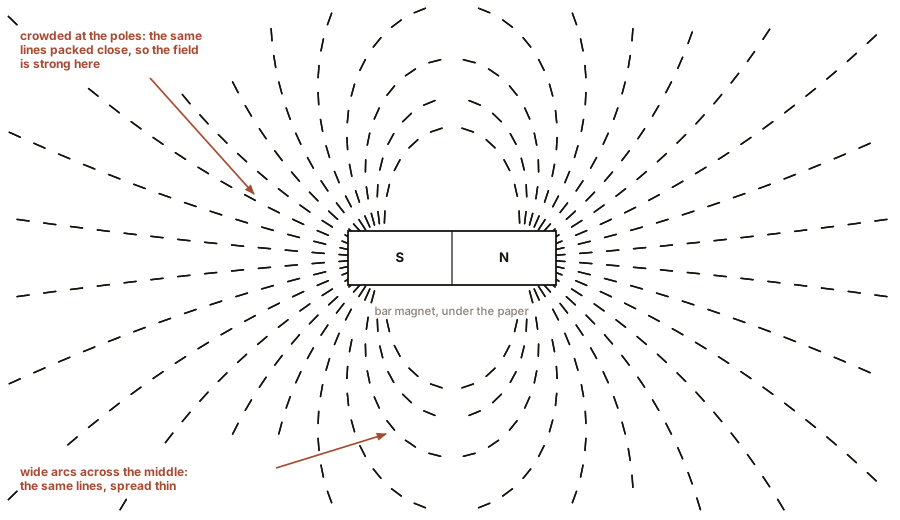
The two ends of a magnet are called poles, north and south. Like poles push apart, opposite poles pull together. Every magnet has both, and no matter how many times you cut a magnet in half you never obtain a single isolated pole. That last fact is not a limitation of your scissors; as far as anyone has ever been able to measure, isolated magnetic poles do not exist.
Section 6: Rule One. Electricity Makes Magnetism
Until 1820, electricity and magnetism were two separate curiosities. Electricity was static shocks, chemical batteries and lightning. Magnetism was lodestones and compasses. Nobody had any solid reason to connect them.
In April of that year, Hans Christian Ørsted was lecturing in Copenhagen with a battery on the bench and a compass nearby. When he closed the circuit, the compass needle twitched.
He spent three months making certain, then published four pages in Latin, and physics changed. A current in a wire produces a magnetic field around that wire. Not along it. Around it, in circles, like the rings of an onion seen end on.
IN PLAIN ENGLISH: Rule One. Push current through a wire and a magnetic field appears around it. More current, stronger field. Stop the current and the field vanishes. You can make a magnet out of electricity, switch it on, and switch it off.
That last part is the useful part. A lodestone is always magnetic. An electromagnet is magnetic when you want it to be. Every relay, every solenoid, every motor and every loudspeaker depends on that one sentence.
The field around a single straight wire is weak. Wind the wire into a coil and each turn’s field adds to its neighbours’, and the coil becomes a proper magnet with a north and a south end. Slide an iron rod into the middle and it becomes far stronger again, for reasons taken up in Chapter 5.
ON THE BENCH: The nail electromagnet
Parts: a steel nail 75 to 100 mm (3 to 4 in) long; 2 m (6 ft) of insulated wire; one AA or AAA battery; a handful of paper clips. Cost: under $5. Time: 10 minutes. Hazards: the wire and the battery both get warm, and a direct short across a battery can get hot enough to burn. Do not use a lithium cell. Disconnect between tries. Method: wind 50 turns around the nail, bare both ends, hold them to the battery terminals, and pick up paper clips. What you should see: the nail lifts several clips while connected and drops all of them the instant you break the connection. Add 50 more turns and it lifts noticeably more. Then: count the maximum clips at 25, 50 and 100 turns and write the numbers down. You have just measured the relationship between turns and field strength, which is the entire design principle of every electromagnet ever built.
Section 7: Rule Two. Changing Magnetism Makes Electricity
Ørsted’s discovery invites the obvious question. If current makes magnetism, can magnetism make current?
Michael Faraday spent ten years on it, and the answer turned out to be a qualified yes with the qualification doing all the work. A magnet sitting beside a coil produces nothing whatsoever. No current, no voltage, nothing. You proved this yourself in the first two minutes of this chapter, when the magnet resting inside the coil left the LED dark.
In 1831 Faraday found the missing condition. The field has to be changing.
Move a magnet toward a coil and current flows one way. Move it away and current flows the other way. Hold it still, anywhere, and nothing flows at all. It is not the presence of the field that matters. It is the change in it.
IN PLAIN ENGLISH: Rule Two. A changing magnetic field pushes current through a nearby wire. Change it faster and you get more. Stop changing it and you get nothing. The word “changing” is not a detail. It is the whole rule.
Now go back to the tube in your hand.
Dropping the magnet gives one brief flicker because the magnet passes the coil once, and the field through the coil rises and then falls, once. A single change, a single pulse of current, a single flicker.
Shaking the tube gives a steady glow because you are changing the field continuously, back and forth, several times a second. Each reversal drives another pulse of current, and your eye blends them into a steady light.
Letting the magnet rest inside the coil gives nothing, no matter how strong the magnet or how many turns you wound, because nothing is changing.
That is your experiment, fully explained. You built a generator. Every power station on earth, whether it burns coal, splits uranium or dams a river, is doing exactly what your hand was doing: moving a magnet near a coil of wire. The differences are all in scale and in what supplies the motion.
SLOW DOWN. Check Your Understanding: You wind a second coil on the same tube, twice as many turns, and connect its own LED. You shake the tube once, at the same speed. Which LED is brighter, and why?
The one with more turns. Each turn of wire feels the same changing field and contributes its own share of push, so the pushes add. Double the turns, roughly double the voltage. Hold on to that answer, because in Chapter 3 it becomes the transformer, and the transformer is the reason the grid outside your window is alternating current.
Section 8: The Two Rules Are the Whole Book
Set them side by side.
| Rule One (Ørsted, 1820) | Current makes a magnetic field. |
| Rule Two (Faraday, 1831) | A changing magnetic field makes current. |
Two sentences, eleven years apart, and between them nearly everything electrical that has been built since.
A motor uses Rule One. Send current through a coil, get a magnetic field, let that field push against another magnet, and something turns.
A generator uses Rule Two. Turn something so a magnet moves past a coil, and get current out. It is a motor run backwards, and the fact that the same machine can do both is not a coincidence but a consequence.
A transformer uses both at once. Current in the first coil makes a changing field by Rule One; that changing field makes current in the second coil by Rule Two. No connection between them but the field itself.
A radio takes the pair to their limit. James Clerk Maxwell noticed that if a changing magnetic field makes an electric one, and a changing electric field makes a magnetic one, then the two can take turns and walk away across empty space without any wire at all. That is Chapter 5, and it is light, and it is radio, and it is every wireless thing you own.
And a man named Nikola Tesla, who is the reason this volume exists and whose face is on its cover, spent his career living inside the word changing. His central insight, which arrives in Chapter 7, was that if you have several coils and you change their fields in a staggered rhythm, you can make a magnetic field that rotates, sweeping around in a circle with nothing moving mechanically at all. Put a lump of metal in that rotating field and it is dragged around after it. No brushes, no contacts, nothing to wear out.
That machine is in your washing machine, your furnace blower, the pumps in your basement and the drivetrain of a considerable number of cars. He worked it out in a park in Budapest in 1882, and it is Rule One and Rule Two, arranged cleverly.
Section 9: Where This Book Is Going
By the last page you will be able to do the following, and you should hold the book to it.
- Wire a three-phase induction motor and reverse its direction, and explain why swapping two wires is sufficient to do that.
- Read a transformer’s nameplate and say what it will and will not do.
- Compute a motor’s synchronous speed from its nameplate and the frequency of the supply.
- Explain to anyone, without notes, why the electrical grid is alternating current, in terms of hardware rather than personalities.
- Look at any electrical machine and identify which of the two rules it is exploiting, and in which direction.
You will also be able to separate what Tesla actually built from what has been claimed on his behalf, which by now is a considerable amount, and to do it by reading the patents rather than by taking anyone’s word including this book’s.
Everything from here is built in order. Nothing arrives that has not been assembled from something earlier. If a chapter loses you, the fault is upstream, and the fix is to go back one section rather than to push on.
Keep the tube. You will want it again in Chapter 4.

Bench Degree
Get the degree without the diploma.
Learn the material, not how to pass the exam.