Bench Degree·FLUID POWERchapter

Chapter 19: What Ruins Brakes
Two of the failures here are the fluid’s fault rather than the mechanism’s, and one of them is why a brake pedal can go soft halfway down a mountain.
Section 1: Disc, Drum, and the Self-Energising Trick
Drums held on for decades, and not out of conservatism. A drum brake multiplies the force you apply to it and a disc brake does not.
Here is the mechanism. A drum brake presses a curved shoe outward against the inside of a rotating drum. Consider a shoe that is pivoted at one end and pushed by the wheel cylinder at the other, arranged so that the drum’s rotation drags the shoe toward its pivot. That drag wedges the shoe harder against the friction surface, which increases the friction, which increases the drag. The brake is helping itself. That is a leading shoe, and it is self-energising.
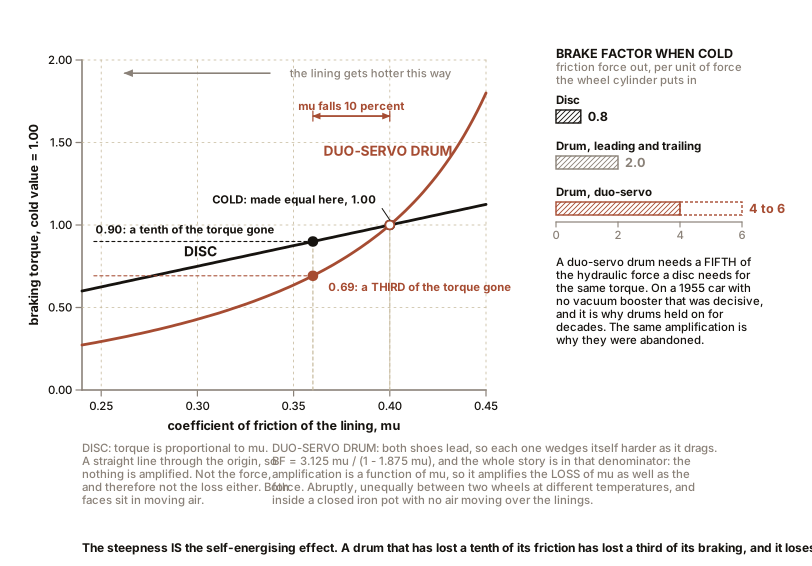
The measure of it is brake factor: the ratio of friction force produced to the force applied by the actuator.
| Brake type | Brake factor |
|---|---|
| Disc | about 0.8 |
| Leading and trailing shoe drum | about 2 |
| Duo-servo drum, both shoes leading | 4 to 6 |
A duo-servo drum needs a fifth of the hydraulic force a disc needs for the same torque, which meant a smaller master cylinder, a smaller wheel cylinder, and no vacuum booster at all. On a 1955 car with no booster, that was decisive.
And the same trick is why it was abandoned. The self-energising effect depends on the coefficient of friction, and it depends on it steeply. Differentiate the brake factor and you find that on a duo-servo drum, a 10 percent fall in the coefficient of friction produces a 30 to 40 percent fall in braking torque.
The coefficient of friction falls when the lining gets hot. So:
- A hot drum brake loses torque far faster than it loses friction. That is fade of the mechanical kind, and it is abrupt.
- A drum is inconsistent between wheels, because two drums at different temperatures have different brake factors, so the car pulls.
- A drum grabs, because the same amplification that boosts the brake also amplifies any variation in the surface.
- And a drum cools badly, because the friction surfaces are inside a closed iron pot with no airflow across them.
A disc’s torque is directly proportional to friction, so a 10 percent fall in the coefficient is a 10 percent fall in braking. Linear, predictable, symmetric, and with both faces of the disc exposed to moving air. The disc’s disadvantage is that it needs five times the hydraulic force, and a vacuum booster supplies exactly that, which is why discs and boosters became normal in the same decade.
Section 2: Distributing the Pressure, in Three Generations
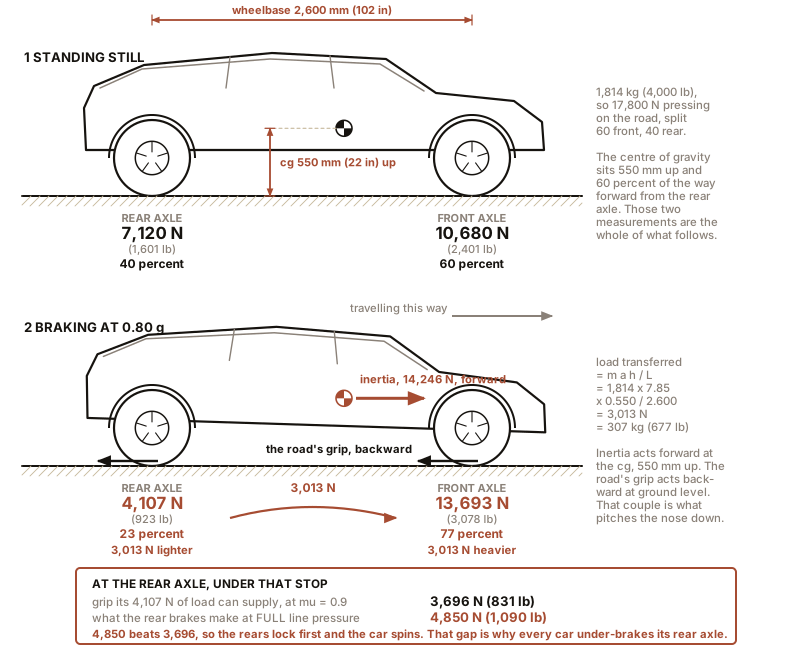
Weight transfers forward under braking, and by a large amount. For a car with a centre of gravity 550 mm (22 in) high and a wheelbase of 2,600 mm (102 in), decelerating at 0.8 g:
load transferred  =  mass x deceleration x cg height / wheelbase
                  =  1,814 x 7.85 x 0.550 / 2.600
                  =  3,013 N,  which is 307 kg  (677 lb)
A car sitting statically at 60 percent front carries 10,680 N on the front axle and 7,120 N on the rear. Under that stop at eight tenths of gravity it becomes 13,693 N front and 4,107 N rear, which is 77 percent front and 23 percent rear.
And a wheel’s grip is proportional to the load on it. So the rear tyres, at 4,107 N of load and a friction limit of 0.9, can supply only 3,696 N of braking between them. Give the rear brakes the same pressure as the front and they will produce more than that, so the rear wheels lock.
A car whose rear wheels lock first spins, because a locked rear tyre has no lateral grip and the back of the car swaps ends. Front wheels locking first produces understeer and a straight-line skid, which is unpleasant and survivable. So every braking system deliberately under-brakes the rear, and the whole history of brake proportioning is three generations of doing that better.
Generation one: the proportioning valve. A spring and piston in the rear brake line that passes pressure one-to-one up to a knee point, typically around 2,000 to 3,000 kPa (290 to 435 psi), and above that passes only a fraction, commonly 0.4 to 0.6. Which is the 60 percent used in Section 2’s arithmetic. Simple, mechanical, and set for one assumed load condition.
Generation two: the load-sensing valve. The same valve, with its spring preload set by a linkage to the rear axle, so the knee point rises when the car is loaded. Fitted to vans and estate cars, where the rear axle load can double, and it addresses the proportioning valve’s weakness directly.
Generation three: electronic brake-force distribution, which is a software function running on the anti-lock hardware. It compares the rear wheels’ speed with the front wheels’ and reduces rear pressure the instant the rears begin to slip more than the fronts. It requires no valve, no spring and no linkage, it adapts to load, road surface, gradient and tyre condition continuously, and it is essentially free once ABS is fitted. Which is why modern cars have no proportioning valve at all.
And one small component worth naming, because it is a real gotcha on older cars: the residual pressure valve. A drum brake’s wheel cylinder uses cup seals which must be kept slightly expanded, or air is drawn in past them as the shoes retract. So drum circuits carry a residual pressure valve holding 40 to 100 kPa (6 to 15 psi) in the line at all times. Disc circuits need almost none, typically 15 kPa (2 psi) or nothing at all. Fit a disc conversion to a car and leave the drum circuit’s residual valve in place and the pads will drag continuously, which cooks the discs and is a puzzling fault if you do not know the part exists.
Section 3: ABS, and the One Brake That Gets No Fluid
Anti-lock braking is a pressure modulation problem, and by now you have all the components.
A tyre’s grip against slip is a curve with a peak. Grip rises as the tyre begins to slip relative to the road, reaches a maximum at roughly 10 to 20 percent slip, and then falls as the slip increases further. A fully locked wheel, at 100 percent slip, has significantly less grip than one slipping 15 percent, and no lateral grip at all, which is why a locked wheel cannot steer.
So the job is to hold each wheel near that peak. The hardware:
- A wheel speed sensor at each wheel, usually a toothed ring and a magnetic or Hall sensor.
- An inlet solenoid valve per wheel, to isolate the wheel from master cylinder pressure.
- An outlet solenoid valve per wheel, to dump that wheel’s pressure into a low-pressure accumulator.
- A pump, to return that dumped fluid to the master cylinder circuit, which is what makes the pedal buzz and kick during an ABS stop.
- A small accumulator for the dumped fluid, which is Chapter 13’s component doing a small job.
And the cycle, run more than fifteen times a second per wheel: if a wheel’s deceleration says it is about to lock, close the inlet to hold the pressure, then open the outlet to release it, let the wheel spin back up, then close the outlet and re-apply. Hold, release, re-apply, repeatedly, for as long as the driver’s foot demands more than the road can supply.
You already understand the hydraulic half of that from Chapter 12, because it is four solenoid directional valves, a pump, an accumulator and a controller, and there is not one idea in it that has not appeared earlier in this book.
And now the one brake that is deliberately not hydraulic.
The parking brake is a cable pulling on a mechanical linkage, or on a modern car a small electric motor driving a screw. It gets no fluid at all, and the reason is a direct consequence of everything above.
A hydraulic system can leak down. Chapter 14’s arithmetic on spool leakage, Chapter 15’s on poppets, and Chapter 13’s on accumulator precharge all say the same thing: hydraulic pressure is held by seals, and seals are a maintained item. A caliper seal seeping a drop a minute is a fault you might not notice for months.
And a parking brake must hold indefinitely, with no energy source, with nobody watching, on a hill, for a fortnight, in the rain. That is precisely the duty a hydraulic system is worst at.
So the one brake that must never fail slowly is the one that gets no fluid. A cable and a lever are self-locking: they hold by geometry and friction, not by pressure, and they do not care how long you leave them. An electric parking brake replaces the cable with a motor and a screw, and a screw of the right pitch is also self-locking, holding its load with the power off. Same reasoning, different century.
Section 4: Measure Your Own Car
ON THE BENCH: Compute your own car’s foot-to-pad ratio, then check the pressure
Parts: a tape measure; a digital luggage or fish scale reading to 50 kg (110 lb), about $10; a vernier caliper or a steel rule; a torch; your car’s handbook. Cost: about $10. Time: an hour. Hazards: the car must be on level ground, in gear or in park, with the parking brake on and the wheels chocked. Do not jack it up for this experiment, and if you do remove a wheel, use axle stands. Do not undo any hydraulic fitting. Brake fluid strips paint and irritates skin. Method, four measurements. 1. Pedal ratio. With a torch, find the pedal’s pivot and the point where the pushrod attaches, which is usually a clevis a short way up the pedal arm. Measure pivot to pushrod centre, and pivot to the centre of the pedal pad. Divide. Expect 4 to 6 to 1. 2. Master cylinder bore. It is usually cast or stamped on the body, or given in the handbook, or on the parts catalogue for your car. Expect 19 to 25 mm (0.75 to 1.0 in). Compute the area. 3. Caliper piston diameter. Look through the wheel spokes at the caliper with a torch. Many are marked. Otherwise the parts catalogue has it. Expect 48 to 60 mm (1.9 to 2.4 in) at the front. Compute the area. 4. Pedal force. Hook the luggage scale over the pedal pad, brace your foot behind it, and pull until the brakes are firmly applied with the engine running. Read it. Most people are surprised: a firm normal stop is 150 to 250 N, which is 15 to 25 kg or 34 to 56 lb, and a genuine emergency stop is 400 to 600 N, which is 41 to 61 kg or 90 to 135 lb. Now compute the chain, using Section 1’s four steps, and assuming a boost ratio of 2.5 to 3 if your car has a booster. What you should get: a foot-to-front-pad ratio somewhere between 50 and 120 to 1, and a line pressure at firm braking between 5,000 and 10,000 kPa (725 and 1,450 psi). Better, if you can borrow one: a brake pressure gauge that screws into a bleed nipple, which is what a workshop uses, will confirm the pressure directly and turn your prediction into a measurement.
ON THE BENCH: Feel the booster arrive, and measure the stored vacuum
Parts: your car, and nothing else. Cost: nothing. Time: 5 minutes. Hazards: do this parked, on level ground, in park or in gear, parking brake on, with nothing in front of the car. Engine off for the first part. Method, and do the three parts in this order. 1. Engine off, and press the pedal firmly several times, five or six presses, until it goes noticeably hard and high. You are exhausting the vacuum stored in the booster. Count the presses: two to five is typical, and each one is one boosted stop you would get after an engine failure. That count is a genuine safety feature and it is why the booster is as large as it is. 2. Now hold steady pressure on the hard pedal and start the engine. The pedal will sink under your foot, immediately and unmistakably, as the engine’s manifold vacuum reaches the booster and 1,885 N, which is 192 kg or 424 lb of atmospheric push, appears behind the diaphragm. You have just felt a pneumatic actuator switch on inside a hydraulic system. 3. Then press the pedal with the engine running and compare the effort with step one. That difference is the boost ratio, and if you have the luggage scale from the previous experiment you can measure it: the same braking effect will need roughly a third of the pedal force. What it teaches: the booster is not a luxury. Without it, Section 1’s chain loses 1,885 N out of 2,985 N, so the line pressure falls from 7,750 kPa to 2,840 kPa (1,124 psi to 412 psi), and the car’s deceleration falls from 0.80 g to about 0.29 g. A stop that took 49 m (161 ft) now takes 135 m (443 ft). That is why a car with a failed booster is still legally driveable and is genuinely alarming.
ON THE BENCH: Test your brake fluid for water, and bleed one caliper
Parts: an electronic brake fluid tester, about $15, or brake fluid test strips, about $10 for a pack; a bleed kit or a length of clear tube and a jar, about $8; fresh fluid of the specification on your reservoir cap; a helper. Cost: about $30. Time: an hour. Hazards: brake fluid strips paint on contact, so cover the wings and wash spills off immediately with water. It is an eye irritant; wear glasses. Never let the reservoir run dry while bleeding, because you will draw air into the master cylinder and then you have a much longer job. Do not reuse fluid. If you are at all unsure, do the water test only and leave the bleeding to a workshop: this is the one system on a car where a mistake has no second chance. Method for the water test: dip the tester or strip into the reservoir per its instructions and read the water percentage. What you should see: under 1.5 percent is good. 2 percent is a service due. Over 3 percent means the wet boiling point in Section 5’s table is what you are driving on. Fluid more than two years old commonly reads 2 to 3 percent, and the car will have shown no symptom whatever. Method for bleeding one caliper: with the engine off, fit the clear tube to the bleed nipple and run it into a jar with a little fresh fluid in the bottom. Have the helper press and hold the pedal. Open the nipple a quarter turn, watch the fluid and any bubbles come out, close it before the helper releases, then let them release. Repeat until no bubbles appear. Top the reservoir up every few strokes. What you should notice, and it is the point of the exercise: note the pedal feel carefully before you start and again afterwards. If there was air in that corner, the pedal will be noticeably higher and firmer, and the first part of its travel will have gone. That change in feel is the 12.8 mm (0.5 in) computed in Section 5, arriving in your foot.
SLOW DOWN. Check Your Understanding: A car’s brakes work perfectly in normal use. On a long alpine descent, after ten minutes of steady braking, the pedal goes progressively closer to the floor and the braking gets weaker, and at the bottom of the hill, after five minutes parked, it is completely normal again. The pads and discs are new, there are no leaks, and the fluid was changed last year. What happened, and what should the driver have done differently? Answer before reading on.
The fluid boiled, and the fact that it recovered is the diagnosis. A leak does not heal, worn pads do not un-wear, and a failed master cylinder does not come back. But vapour condenses. As the caliper cooled, the vapour bubbles turned back into liquid, the system became incompressible again, and the pedal returned to normal with no trace of the fault. That recovery is the signature of vapour lock and it is what distinguishes it from every mechanical failure.
And note that year-old fluid was enough. Section 5’s table says DOT 4 with under two years of water in it boils around 155 to 170 °C (311 to 338 °F), and a caliper on a sustained descent gets there comfortably. New pads made it worse rather than better, because a new pad has a higher coefficient of friction, so it puts more heat into the disc for the same pedal effort.
What the driver should have done is use the engine. Braking converts the car’s potential energy into heat in the discs at a rate of
mass x gravity x descent rate. A 1,814 kg (4,000 lb) car descending at 5 m/s of vertical speed is dissipating1,814 x 9.81 x 5 = 89 kWinto four discs, which is the output of twelve domestic kettles into four lumps of iron. No brake in the world sheds 89 kW indefinitely. Selecting a low gear puts most of that energy into the engine, which has a radiator, a water pump and a fan specifically for shedding tens of kilowatts continuously. The brakes are a device for converting kinetic energy to heat quickly. The engine and its cooling system are a device for shedding heat continuously. Using the first for the second’s job is the actual error, and it is the one thing about mountain driving worth teaching everyone.
Brakes are the hydraulics everyone owns. The next chapter is the hydraulics almost nobody sees, running at three times the pressure, in triplicate, several kilometres above your head.

Bench Degree
Get the degree without the diploma.
Learn the material, not how to pass the exam.