Bench Degree·REFRIGERATIONchapter

Chapter 11: Building a Cooler on the Bench, and Then Running It Backwards
A ten dollar ceramic square will pump heat uphill with nothing moving inside it. Then you disconnect the power, apply a temperature difference instead, and it generates electricity. One component, a heat pump and a heat engine, in one afternoon.
Ten chapters of theory deserve something you can hold. This chapter builds a working cooler, measures it, and then does something better: runs the same part backwards.
It also draws a line. There is a build in this chapter you should do, and a build this chapter will not ask you to do, and the reason for the second is stated plainly rather than dressed up.
Section 1: What You Are Building, and Why Not the Other Thing
What you will build: a thermoelectric cooler. A solid-state heat pump with no refrigerant, no pressure, no moving parts and no hazard beyond a warm heatsink. It teaches heat pumping honestly, it costs about fifty dollars, and it does something no vapour-compression build can: it runs backwards and becomes a generator.
What this chapter will not ask you to build: a vapour-compression system. Not because it is beyond you intellectually. Because of what it actually requires:
- Brazing with silver alloy at around 650 °C (1,200 °F) under nitrogen purge, on tubing that will hold 2,900 kPa (425 psig).
- A vacuum pump capable of pulling below 500 microns, and a micron gauge to prove it did, because any moisture left inside forms acid and freezes at the metering device.
- A recovery machine, because venting refrigerant to atmosphere is illegal in most jurisdictions.
- In the United States, EPA Section 608 certification, without which you cannot legally buy refrigerant at all.
That is a workshop, a licence and about two thousand dollars, and it is a trade rather than a bench project. This book teaches you to read, measure and diagnose those systems, not to fabricate them, and Chapter 12 onward is where that pays off. Where the bench cannot reach, this book says so.
IN PLAIN ENGLISH: You can understand a vapour-compression machine completely without building one, the same way you can understand an internal combustion engine without casting a block. What you cannot do is understand heat pumping without ever having pumped heat, and that is what the thermoelectric build is for.
Section 2: How a Peltier Module Works
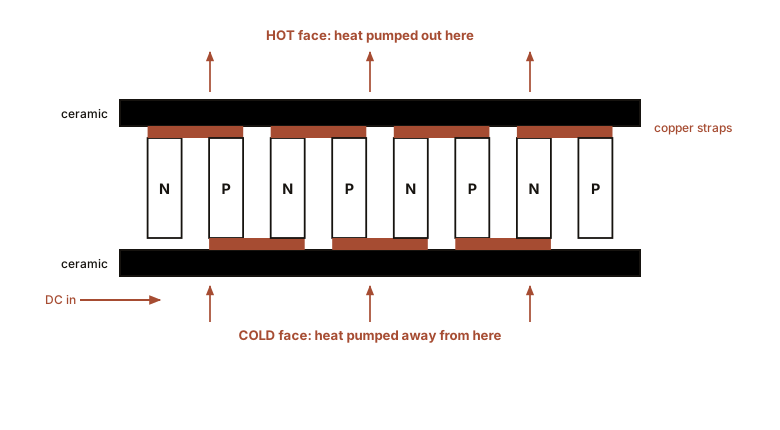
The part is a flat ceramic square, typically 40 by 40 mm (1.6 by 1.6 in) and 4 mm (0.16 in) thick, with two wires. Inside are perhaps a hundred small pillars of bismuth telluride, alternately doped n-type and p-type, sandwiched between the two ceramic faces and wired in series so that current passes up through one pillar and down through the next.
Why that arrangement moves heat. In an n-type semiconductor the charge carriers are electrons; in p-type they are holes. When current crosses from one type to the other it must either absorb energy or release it, depending on the direction of the crossing. Arrange the junctions so that every crossing on the top face absorbs and every crossing on the bottom face releases, and current flowing through the stack carries heat from one face to the other.
That is the Peltier effect, discovered by Jean Charles Athanase Peltier in 1834, the same year as Perkins’s patent, and unused for anything practical for well over a century because no material was good enough.
What it means in practice. Apply 12 V and the module will develop a temperature difference of 60 to 70 °C (108 to 126 °F) between its faces. Not a cold face at some absolute temperature: a difference. Which leads to the single most important fact about using one:
The cold side is only cold if the hot side is properly cooled. A module with its hot face against still air will heat up until both faces are hot and the cold face is merely less hot. The heatsink is not an accessory. It is most of the design.
Section 3: The Build
ON THE BENCH: A thermoelectric cooler
Parts: - Peltier module, 40 x 40 mm (1.6 x 1.6 in), 12 V, 60 W class, often sold as TEC1-12706 or similar. About $10. - CPU heatsink with a 12 V fan. Any scrap tower cooler. Free from a dead computer, or $12. - A second small heatsink for the cold face, optional but helpful. - 12 V supply capable of at least 6 A. A bench supply is ideal; a spare laptop-style brick will do if it is rated properly. About $20. - Thermal paste. $6. - An insulated box: a small cooler bag, or rigid foam board and tape. $10. - Two thermometers, ideally thermocouple probes.
Cost: about $50, less if you have a dead PC. Time: two hours.
Hazards. The hot side gets genuinely hot, 70 °C (158 °F) or more if the heatsink is undersized, and will burn a finger. Modules draw 5 to 6 A, so wiring gets warm; use at least 18 AWG. Never run the module without the heatsink attached and the fan running, even for a few seconds, because it will cook itself and delaminate. Condensation will form on the cold side, so keep water away from electrical connections.
Method. 1. Identify which face is which. With the red lead to positive, the face with the printed lettering is normally the cold side, but verify at low power before committing to a build. 2. Thermal paste, thinly, on both faces. Too much is worse than too little. 3. Clamp the hot face against the CPU heatsink. Firm, even pressure across the whole face; a module is brittle and will crack if clamped at one corner. 4. Cut a hole in your insulated box and mount the module so the cold face is inside and the heatsink is outside. Seal round the edges. 5. Fan and module on 12 V. Thermometer inside the box, thermometer on the heatsink.
What you should see. Inside temperature falling within a minute or two, reaching 15 to 25 °C (27 to 45 °F) below ambient in a small well-sealed box after twenty minutes. Heatsink noticeably warm. Condensation on the cold plate.
Measure and record, because Section 4 needs it: supply voltage, current draw, the box temperature, ambient temperature, and the time taken to reach steady state.
When it disappoints. Almost every failed build has one of three causes, in this order: the hot side is not being cooled well enough, the box is not sealed, or the thermal contact is poor. Turn a desk fan on the heatsink and watch the cold side get colder immediately. That one observation is worth the whole build, because it makes the Chapter 9 point physical: a heat pump’s cold end is limited by how well its hot end can dump.
Section 4: Measuring What You Built
Now do to your own machine what Chapter 13 will do to a real one.
Electrical power in is straightforward: volts times amps. A typical build draws 12 V at 5 A, which is 60 W.
Heat pumped is harder, and the honest way to get it
is by measuring how fast the box warms back up. Switch the module off,
log the box temperature every thirty seconds as it returns to ambient,
and take the initial slope. If you know the mass and specific heat of
the air and contents, Q = m c ΔT / t gives you a heat leak
rate, and at steady state the heat the module was pumping equals the
rate heat was leaking in.
Put a bottle of water inside instead of air and the measurement gets far easier, because water’s specific heat is known precisely and its mass is on your kitchen scale.
And then the disappointing number. A thermoelectric cooler achieves a coefficient of performance of roughly 0.3 to 0.6. It consumes 60 W of electricity to move perhaps 20 to 35 W of heat.
Compare that with the vapour-compression machine of Chapter 10, which moved 10.5 kW of heat for 3.5 kW of electricity. Divide the first by the second and you get 3.0: three units of heat moved per unit of electricity spent. That ratio is called the coefficient of performance, or COP, and it is the only efficiency number that matters in this subject. Chapter 13 does it properly; for now, bigger is better and 3.0 is respectable.
Your bench cooler is about six times worse than the machine in your window, and that is not a flaw in your build. It is the technology. Thermoelectrics are poor because of a materials conflict explained in Section 6, and knowing that number is more valuable than a build that pretended otherwise.
SLOW DOWN. Check Your Understanding: Your module draws 60 W and pumps 30 W of heat out of the box. How much heat is the heatsink rejecting? Think before reading on.
90 W. The 30 W taken from the box plus the full 60 W of electrical input, because all of that electricity ends up as heat too and it has nowhere to go but out through the hot face. This is exactly the accounting of Chapter 10 Section 8, where the condenser rejected the house’s heat plus the compressor’s input. The hot side always has to deal with more than the cold side removed, which is why the heatsink is the hard part of the design.
Section 5: Now Run It Backwards
This is the best five minutes in the volume.
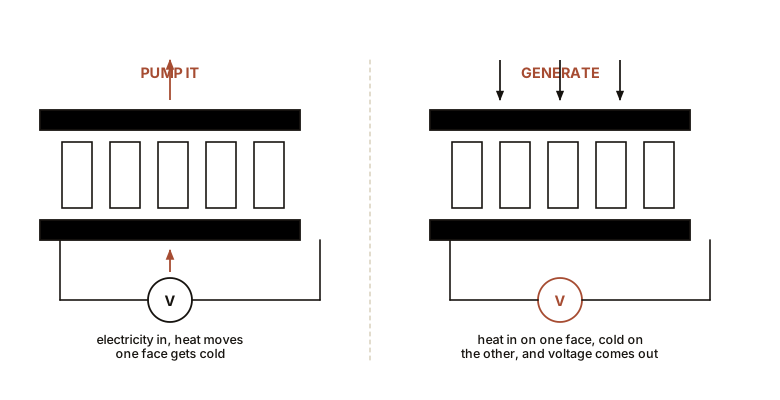
Disconnect the power supply entirely. Take the module out of the box if you need to. Now put something hot against one face and something cold against the other, and put a multimeter across the two wires.
It generates electricity.
ON THE BENCH: The same part, as a generator
Parts: the module you just used; a mug of boiling water; a bag of ice or a block of ice; a multimeter; the heatsink. Cost: nothing further. Time: 15 minutes. Hazards: boiling water. And do not exceed about 150 °C (300 °F) on the hot face or the module’s internal solder will melt, so a mug of boiling water is fine and a gas flame is not. Method: clamp the module between the hot and cold sources with thermal paste or at least firm contact. Read open-circuit voltage. Then connect a small load, a 10 ohm resistor or a low-current LED, and read voltage and current. What you should see: with roughly 80 °C (144 °F) across the faces, several hundred millivolts to a couple of volts open circuit, and tens of milliamps into a load. Enough to light an LED outright. Stack three or four modules in series and you can trickle-charge a phone. Then remove the ice and watch the output collapse as the two faces equalise. The output depends on the difference, not on either temperature. A module with both faces at 200 °C (392 °F) produces nothing at all.
That is the Seebeck effect, and it is the Peltier effect run in reverse. Same part. Same physics. Current in gives you a temperature difference; a temperature difference gives you current out.
You have built a heat pump and a heat engine out of one component in one afternoon, which is the deepest duality in thermodynamics arriving in the cheapest possible package.
The callback you did not see coming
Go back to Chapter 4, Section 4. You calibrated a thermocouple against ice water and boiling water.
A thermocouple is a Seebeck device. Two dissimilar conductors joined at a point, producing a voltage that depends on the temperature of the junction. It is the same effect you just used to light an LED, made small and calibrated instead of large and powerful.
You have been using a tiny electrical generator as a thermometer since Part III, and nobody told you.
Section 6: Why It Is So Inefficient, and Where It Wins Anyway
The efficiency problem is a materials conflict, not an engineering failure. A good thermoelectric material needs three things at once:
- High electrical conductivity, so the current it generates is not lost to internal resistance.
- Low thermal conductivity, so the temperature difference you worked to create does not simply leak back through the material.
- A large Seebeck coefficient, meaning a lot of volts per degree.
The trouble is that in almost every solid, electrical and thermal conductivity travel together. The same free electrons that carry current also carry heat. Make a material better at one and you usually make it better at the other, which is the wrong direction.
The figure of merit that captures the fight is called ZT, and after seventy years of work the best commercial materials sit around ZT = 1, which corresponds to a few percent efficiency. Bismuth telluride is the workhorse compromise.
And yet it wins outright wherever reliability beats efficiency:
Voyager 1 launched in 1977 with three radioisotope thermoelectric generators and is still transmitting, forty-eight years later, its output declining exactly as the 87.7-year half-life of plutonium-238 predicts and not otherwise. Nothing moved. Nothing was maintained. Nothing was ever going to be.
Wood stove fans sit on the stove top and blow air using electricity generated from the stove’s own heat. No batteries, no wiring, and they start themselves when the stove gets hot.
Remote instrumentation on gas pipelines, where a small permanent power source with no moving parts is worth any amount of inefficiency.
Precise small-scale cooling, in laboratory instruments, laser diodes and camera sensors, where the point is not capacity but control: a thermoelectric can be driven to a set temperature in either direction by reversing the current, which no compressor can do.
And the one you can walk into a shop and buy: the wine cabinet. A wine cooler with no compressor in it is a thermoelectric machine, and it is the only refrigerator most people will ever own that has no compressor at all. The reason it succeeds where your bench build disappointed you is not better engineering. It is that the lift is small. Long-term wine storage wants about 12 to 13 °C (54 to 55 °F), and a living room sits near 22 °C (72 °F), so the cabinet is asked for a lift of about 10 °C (18 °F). Your module was being asked to make ice, a lift of 30 °C (54 °F) or more, and Section 4’s measurement is what that costs.
Which also predicts the complaint owners make. Put the same cabinet in a garage at 30 °C (86 °F) and it will not hold 12 °C (54 °F), because the lift is now 18 °C (32 °F) and the module runs out of pumping capacity well before it gets there. That is the commonest thing said against these machines and it is not a fault. It is the specification, read correctly, and you can now read it.
One claim in the sales copy is worth separating from the physics. These cabinets are sold on the idea that a compressor’s vibration harms wine as it ages. The engineering half is solid: no compressor means no vibration, and a fan is the only thing left to hear. The premise is thinner than the marketing. Published evidence that low-level vibration damages bottled wine over years is sparse and mixed, and most of what exists concerns transport rather than a cabinet standing in a cellar. Buy one for the silence, which is real and can be measured with a phone. Treat the ageing argument as a claim by the person selling it.
IN PLAIN ENGLISH: A thermoelectric module is a bad refrigerator and a bad generator and an excellent thermostat with no moving parts. Choose it when what you need is reliability, precision or silence, and never when what you need is efficiency.
Section 7: What You Have and What You Have Not
You have pumped heat uphill with your own hands and measured the price. You have found out that the hot side is the hard part. You have generated electricity from a temperature difference, and discovered that the thermometer you have been using all book is the same device.
You have not built a vapour-compression machine, and you are not going to. What you will do instead, starting in the next chapter, is put gauges and thermometers on machines other people built and tell them what is wrong with them, which is a more useful skill and one that pays.
Chapter 12 takes the two numbers you met at stations 1 and 5 of Chapter 10, superheat and subcooling, and turns them into a complete diagnostic method. It is the chapter where this book stops explaining and starts being useful.

Bench Degree
Get the degree without the diploma.
Learn the material, not how to pass the exam.