Bench Degree·REFRIGERATIONchapter

Chapter 12: Superheat and Subcooling
Two numbers, taken from outside a sealed steel loop, tell you almost everything about what is happening inside it. This is the chapter where the book stops explaining and starts being useful.
A refrigeration system is welded shut. You cannot see the refrigerant, cannot sample it, and cannot open it without destroying the charge and breaking the law. Everything you will ever know about its internal condition has to be inferred from the outside.
And it can be, almost completely, from two numbers.
Both were introduced in Chapter 10 and both depend entirely on Chapter 7’s saturation curve. If you are hazy on saturated, superheated and subcooled, go back to Chapter 7 Section 2 before continuing, because this chapter is that section applied.
Section 1: The Two Definitions
Superheat is how much hotter the vapour is than its own boiling point at the pressure it is under.
Superheat = (measured suction line temperature) − (saturation temperature for the low-side pressure)Subcooling is how much colder the liquid is than its own condensing point at the pressure it is under.
Subcooling = (saturation temperature for the high-side pressure) − (measured liquid line temperature)Both are differences, not temperatures. Both require two measurements: a pressure, converted to a saturation temperature with the card from Chapter 7, and an actual metal temperature from a clamp thermometer. Neither can be obtained from a single instrument.
IN PLAIN ENGLISH: Superheat asks “has all the liquid finished boiling, and by how much margin?” Subcooling asks “has all the vapour finished condensing, and by how much margin?” One guards the compressor. The other guards the metering device.
Section 2: How To Actually Take Them
ON THE BENCH: The two measurements
Parts: gauge manifold matched to the refrigerant; two pipe clamp thermocouples; a pressure-temperature card for that refrigerant. Cost: manifold $60 to $140, thermocouples $20 each. Time: 30 minutes once, ten minutes thereafter. Hazards: gloves and eye protection. Liquid refrigerant causes instant frostbite and blinds. Never open the high side to atmosphere. Every hose connection loses a little refrigerant, so learn on a scrap unit. Deliberate venting is illegal in most jurisdictions.
For superheat: 1. Run the machine at least fifteen minutes so it is at steady state. Readings taken on a machine that has just started are meaningless, and this is the commonest error. 2. Connect the low-side gauge to the suction service port. Read the pressure. 3. Look up the saturation temperature for that pressure. 4. Clamp a thermocouple to the suction line, within about 150 mm (6 in) of where it leaves the evaporator, and insulate the clamp so it reads pipe rather than air. 5. Subtract.
For subcooling: 1. Connect the high-side gauge to the liquid service port. Read the pressure. 2. Look up the saturation temperature for that pressure. 3. Clamp a thermocouple to the liquid line, near the condenser outlet, insulated. 4. Subtract the other way round.
Worked example on a healthy machine.
Low side 820 kPa (119 psig). Card says saturation 4 °C (40 °F). Suction line measures 11 °C (52 °F). Superheat = 11 − 4 = 7 °C (13 °F). Healthy.
High side 2,930 kPa (425 psig). Card says saturation 49 °C (120 °F). Liquid line measures 41 °C (105 °F). Subcooling = 49 − 41 = 8 °C (14 °F). Healthy.
Insulate the clamps. An uninsulated thermocouple on a cold suction line reads partly the surrounding air, which is warmer, which inflates superheat, which makes a flooded system look starved. This single mistake has caused more wrong diagnoses than any other in the trade.
Section 3: What Superheat Proves
Superheat is a report on the evaporator, and specifically on whether the refrigerant finished boiling before the end of the coil.
Normal superheat is 4 to 8 °C (8 to 15 °F) measured at the evaporator outlet.
Low superheat, approaching zero, is the dangerous one. It means the refrigerant had not finished boiling when it left the coil, so liquid is travelling down the suction line toward the compressor. Chapter 9’s one rule: liquid destroys compressors. Zero superheat is a machine about to break, and it should be shut down rather than watched.
Causes, in order of likelihood: overcharge; a metering device passing too much, such as a TXV with a failed sensing bulb; airflow across the evaporator far higher than design; or a system running with far more load than it was built for.
High superheat, above about 15 °C (27 °F), means the evaporator is starved. The refrigerant finished boiling early, and the last part of the coil is doing nothing useful except warming vapour, which is a feeble use of expensive surface area. Capacity is down and the machine runs and runs without satisfying.
Causes: undercharge, which is by far the commonest; a restriction in the liquid line or metering device; or a plugged filter drier.
SLOW DOWN. Check Your Understanding: A machine has 22 °C (40 °F) of superheat. Is it overcharged or undercharged, and why? Think before reading on.
Undercharged, or restricted. High superheat means the refrigerant ran out of liquid early in the coil, which means not enough liquid is arriving. An overcharged system does the opposite: too much liquid arrives, boiling continues right to the end of the coil and beyond, and superheat falls toward zero. High superheat means starved, low superheat means flooded. Those two sentences are worth more than any table.
Section 4: What Subcooling Proves
Subcooling is a report on the condenser and on the charge, and specifically on whether all the vapour finished condensing with some margin to spare.
Normal subcooling is 5 to 11 °C (10 to 20 °F) at the condenser outlet.
Low subcooling, approaching zero, means the condenser is not finishing the job. Vapour is mixed into the liquid leaving it, so what arrives at the metering device is a fizzing mixture rather than solid liquid. Chapter 10 Section 5 explained why that destroys capacity: bubbles pass far less mass than liquid.
Causes: undercharge, which is again the commonest; or insufficient condenser performance from a dirty coil, a failed fan or blocked airflow.
High subcooling, above about 14 °C (25 °F), usually means too much refrigerant. Excess liquid backs up into the condenser, occupying coil that should be condensing vapour, and gets cooled further than necessary. It also raises head pressure, which raises compressor work and shortens its life.
Causes: overcharge; or a restriction downstream holding liquid back in the condenser.
Section 5: The Two Together, Which Is the Actual Diagnostic
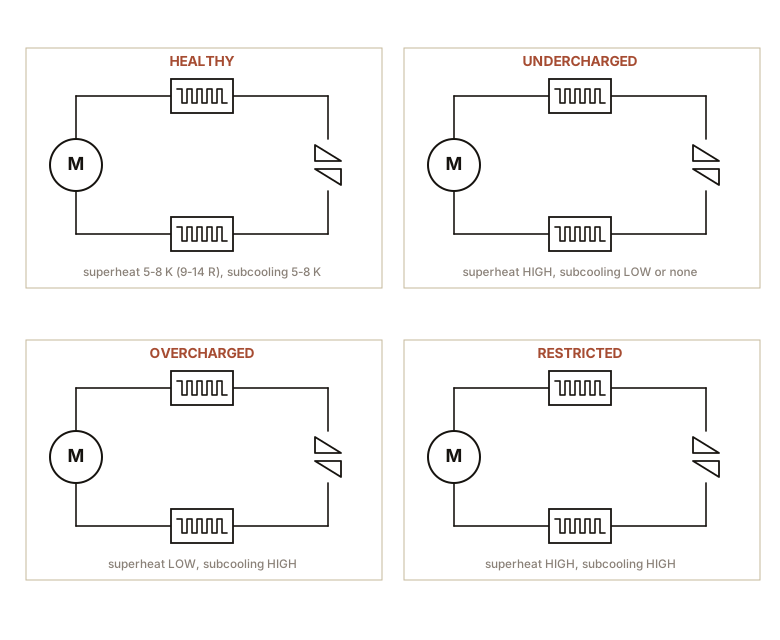
Neither number alone identifies a fault. Together they do, because most faults move them in a characteristic pair.
| Superheat | Subcooling | Most likely diagnosis |
|---|---|---|
| High | Low | Undercharge. Not enough refrigerant to fill either coil properly. The commonest fault in the field. |
| Low | High | Overcharge. Too much refrigerant flooding both ends. |
| High | High | Restriction between condenser and evaporator: plugged drier, kinked liquid line, failed metering device. Liquid backed up behind the blockage, evaporator starved in front of it. |
| Low | Low | Metering device passing too much, or a compressor not pumping properly. |
| Normal | Normal | Charge is right. If it still is not cooling, the problem is airflow, load, or the compressor’s capacity. |
That table is the single most useful thing in this book. Two measurements taken from outside a sealed system, and you have distinguished undercharge from overcharge from restriction, which are three faults that look identical from the front of the machine.
The third row deserves a note because it is the one people get wrong. High superheat and high subcooling at once is the signature of a restriction, and it looks contradictory until you picture it: liquid is piling up upstream of the blockage where it keeps getting cooler, while downstream the evaporator is being starved. One fault, two coils, opposite symptoms.
Section 6: Which Number To Trust, and When
An important refinement, because the metering device changes what each number can tell you.
On a fixed-orifice or capillary-tube system, the metering device cannot adapt. So the charge determines everything, and superheat is the primary charging measurement. Manufacturers publish superheat charging charts indexed by indoor wet-bulb and outdoor dry-bulb temperature, which is why Chapter 14’s psychrometrics is needed before you can charge one properly.
On a TXV or EEV system, the valve actively maintains superheat at its setpoint. So superheat will read normal across a wide range of charges, because the valve is compensating. Subcooling becomes the primary charging measurement, and superheat becomes a check on the valve rather than on the charge.
Getting this backwards is a classic error: adding refrigerant to a TXV system because superheat looks high, when in fact the valve was fine and the airflow was blocked.
IN PLAIN ENGLISH: On a cheap fixed metering device, superheat tells you about the charge. On a system with a self-adjusting valve, the valve hides the charge from superheat, so subcooling is what you trust. Always find out which kind you are looking at before believing either number.
Section 7: The Third Number, Briefly
Two numbers do most of the work, but a third is worth taking whenever a machine is being judged on capacity rather than on charge: the temperature split across the evaporator.
Split = (return air temperature) − (supply air temperature)For comfort cooling at normal humidity, expect 11 to 12 °C (20 to 22 °F). Higher usually means airflow is too low, so each unit of air is being over-cooled. Lower means airflow is too high, or the machine has lost capacity, or the room is unusually humid so latent load is consuming capacity that would otherwise show up as temperature drop.
That last case is exactly why Chapter 14 exists. A machine doing heavy dehumidification shows a smaller temperature split while working just as hard, and reading that as a fault sends technicians hunting for problems that are not there.
ON THE BENCH: Make the numbers move
Parts: your gauges, your thermocouples, a scrap window unit you do not care about, cardboard. Cost: nothing beyond the instruments. Time: an hour. Hazards: as Section 2. Do this on a scrap machine. Method: establish baseline superheat, subcooling and temperature split on a healthy machine. Write them down. Then introduce one fault at a time and re-measure after ten minutes: 1. Block half the condenser airflow with cardboard. Predict what happens to head pressure and subcooling before you look. 2. Restore, then block the evaporator return air most of the way. Predict superheat and low-side pressure. 3. Restore, then obstruct the airflow slightly and permanently and note how a mild fault produces mild readings, which is how real faults present. What you should see: condenser blockage drives head pressure and subcooling up. Evaporator blockage drives low-side pressure and superheat down, because less heat is arriving so less refrigerant boils. Each fault moves the pair in the direction the Section 5 table predicts. The point: you have now seen the diagnostic work in both directions, from symptom to cause and from cause to symptom, which is the difference between memorising a table and understanding one.
Section 8: Targets, With a Warning
| Measurement | Typical healthy range |
|---|---|
| Superheat at evaporator outlet | 4 to 8 °C (8 to 15 °F) |
| Superheat at compressor inlet | 11 to 17 °C (20 to 30 °F) |
| Subcooling at condenser outlet | 5 to 11 °C (10 to 20 °F) |
| Evaporator temperature split | 11 to 12 °C (20 to 22 °F) |
| Condensing temperature above ambient | 11 to 17 °C (20 to 30 °F) |
| Evaporating temperature below return air | 17 to 22 °C (30 to 40 °F) |
And the warning. Those are typical values, not specifications. The manufacturer’s published figures for the specific machine always win, and they will differ, sometimes substantially, for high-efficiency equipment, for heat pumps in heating mode, and for anything with a variable-speed compressor.
Two suction superheat figures are listed because they are different measurements. At the evaporator outlet you are testing the coil. At the compressor inlet, after the suction line has run through a warm space, you are testing whether the compressor is protected. Both matter, and confusing them produces an argument about which of two correct readings is wrong.
Section 9: What This Chapter Bought You
You can now diagnose a sealed machine from outside it. Two pressures, two clamp temperatures, one card, and the Section 5 table.
High superheat means starved. Low superheat means flooded. Low subcooling means not enough refrigerant or a struggling condenser. High subcooling means too much.
Together they separate undercharge from overcharge from restriction, which are three different faults with identical symptoms at the front panel.
Which number to trust depends on the metering device. Fixed orifice: superheat. TXV or EEV: subcooling.
And the most common practical error is not arithmetic, it is taking readings before the machine reaches steady state, or failing to insulate a thermocouple clamp.
Chapter 13 takes the same cycle and plots it on a single chart, which turns these two numbers into two line segments and lets you read efficiency straight off the page.

Bench Degree
Get the degree without the diploma.
Learn the material, not how to pass the exam.